

Chaotic Christmas Countdown
DAY 44
Today I have the honor of going to Tulsa with my girlfriends and meeting up with "MY" Kerin!!! OHHHHH how I miss her!!! SOOOOOO, this is a very HAPPY, HAPPY, HAPPY day for me!!!
Like I said last night, I am hanging out in blogland and I came across this really cute blog
SALTTREE!!! As many of you know, I have a GINGERBREAD HOUSE PARTY every year for the kids and when I was browsing her blog she had made the CUTEST felt gingerbread houses!!! SO, I am featuring her gingerbread house and tutorial today!!!! Be sure to stop by her blog and check it out!!! I am thinking party favors....maybe???
TOOOOO STINKIN CUTE!!!! ;)
See you tomorrow for
Day 45!!!!
See you tomorrow for
Day 45!!!!

I'm a married working Mom of a one year old little man who is my world! I started blogging while on mat leave and haven't looked back. Recipes, crafting, DIY projects and family moments are what you'll find there. I hope you'll come for a visit!
Without further ado, let's get to the good stuff!

I recently saw some adorable ornaments in a store while browsing the
holiday aisles.... I do love Christmas! I knew I could easily make it, cheaper but better. A felt gingerbread house ornament. And, it's NO SEW. Let's go!
Materials needed;
1 sheet of brown craft felt (9x12)
1 sheet of white craft felt (9x12)
Scraps of various colours of felt or other decoration of your choice
Glue gun / glue
I put all the steps into a montage of sorts. Read below for descriptions of the steps.
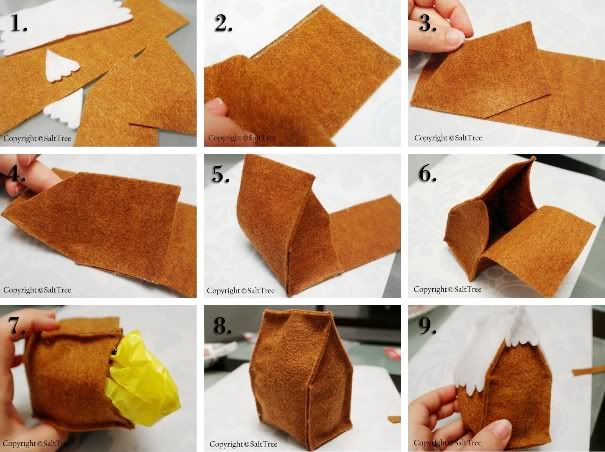
1.
Cut out your felt pieces as per the template provided at the end of
this post. Part's A and B will be the house colour. I used brown for
this. Parts C and D I used white for the snow.
2. Start with parts A and B. Apply a bead of hot glue along the felt, almost at the edge, starting from the peek of the roof.
3. Stick part A, to part B like shown in the image.
4. Run another bead of glue down what would be the side of the house, gluing it at the edges with piece A.
5. Continue wrapping and gluing piece A around piece B.
6. Before you get to far, start gluing on the back of the house (the other B piece) using the same method.
7. Stuff the house with something foofy. Use whatever you have, cotton balls, tissue... I used a plastic grocery bag.
8. Glue the roof closed.
9. Glue on the 'snow', pieces C goes over the roof and D goes at the peak on the front and back.

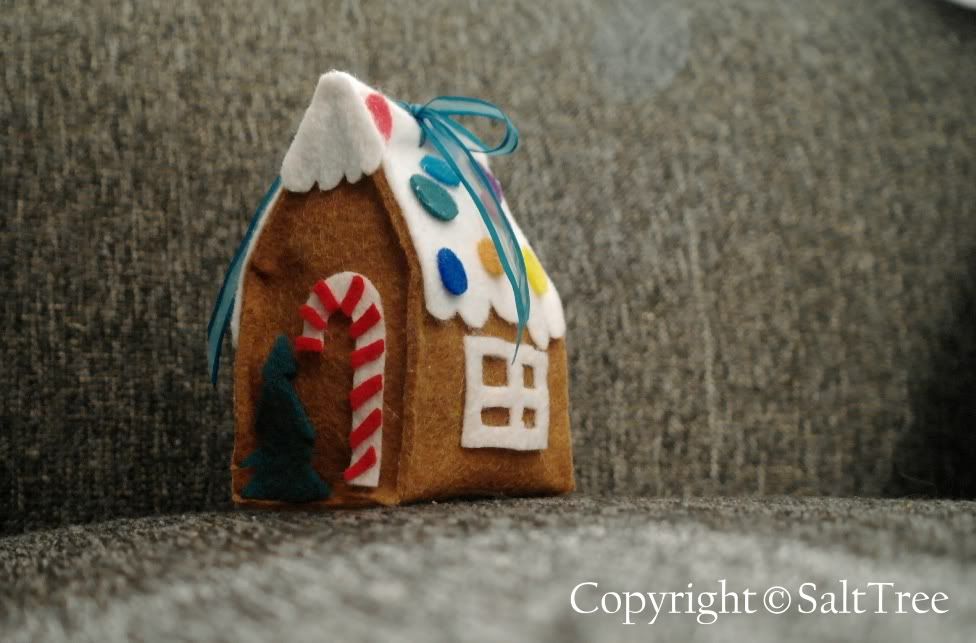
All that is left is the decorating! There are no rules here. Do what ever makes you happy :) I cut out some little windows and candy for the snow covered roof. You could use beads, glitter or even pipe cleaner to decorate it. To finish it off, I threaded a piece of ribbon through the top so it could be hung.
Template available here, (There are two pages, so be sure to get both of them!).
Gingerbread Template pg1
Gingerbread Template pg2
Thanks again Randee for having me!
Amber
SaltTree

Those are adorable.
ReplyDelete